For a while I struggled to understand what Substance Designer was for and how it would offer benefits beyond those of using Photoshop, and how is it different from Painter.
I admit, I feel stupid about the last part of that statement now, but it was a genuine concern… I now realise it’s total ignorance as this week I finally realised how useful and beneficial to my workflow Designer is going to prove.
After my enjoyable time getting to grips with Painter, I decided I needed to know how Designer works. After watching the excellent video tutorials from Allegorithmic, I had many “eureka” moments and couldn’t believe I hadn’t given this piece of software a chance before now as it appeals to a certain type of workflow, one that I am predominately drawn to. More than that however, I have recently learned with announcements/new features in Substance Painter 2.2 (multi layered materials) and Unreal Engine 4.13 (mesh-based Normal Map Decals), that Designer is going to play a vital role in providing more efficient use of materials as there is a shift away from mesh object baked textures and materials.
Other reasons why Designer is worth learning include the fact that pretty much all the decent effects generated in Painter are Substances (sbsar files) and Designer is where they are created. These files are tiny and can have properties exposed for customisation. They are also resolution independent which is why you can change the document resolution in Painter at any point.
Basically, if you want to take control over your surfaces and expand the customisation options from an existing Substance or create a new Substance from scratch, having a good working knowledge of Designer is essential.
First Attempts
As with my recent experience of learning Painter (and previous software that was new to me), I started my journey of discovery by following a basic video tutorial series that orients you to the interface and workflow via a gentle learning curve.
The end product of the tutorial was a metallic walkway material that had exposed parameters to control things like the amount of rust, the hue of the surfaces and the native resolution.
I put my own spin on the process (nothing that deviated too far from the tutorial) and created a material that featured raised discs:

The method for constructing these materials is all node driven (much like creating materials in Unreal Engine). However, unlike Unreal, the nodes here perform basic adjustments to the pixels and yet there isn’t a bitmap in sight! It’s an excellent approach that might seem overkill at first but when you realise you can create amazing surfaces without storing any bitmap data (except the output*) then you quickly realise the power of this software.
*It gets even better if the output platform you are working with supports the Substance plugin because then there are no massive bitmaps to deal with. In fact, it is possible to generate the whole material library for a game using Substances which can reduce the storage requirements of the materials from GB’s to MB’s.
Really enjoyed my introduction and am fast understanding why Designer is going to be essential to learn.

Another great aspect of Designer is the ability to share your Substances with the community. I was so proud of myself to creating my first substance I decided to upload the material to Substance Share!
Next Steps…
After getting the hang of the interface and workflow I wanted to ramp up the power of this software so I set about the intermediate-advanced tutorials to take advantage of my free time and desire to learn.
The material created in the first part of that play list is insanely detailed and very customisable. I watched all the videos but decided to scale back my desired output to just be about creating a rock texture. I understood how to create the height-dependant colour map and water so I didn’t feel the need to copy the process exactly.
Below is my rock texture which I think will come in very handy in the near future:

The node network does start to look a little overwhelming as you crank up the subtle details but there are tools to help you keep your graph readable:

Making it on my own…
Copying (and adapting) tutorial videos is a perfect introduction to new software. However, you should give yourself a little test to see how much as sunk in (through observation and implementation).
As with my other learning experiences, I set myself a little challenge. I performed a quick Google image search for a tileable path made out of interestingly shaped blocks – something that I would need to really investigate how to create in Designer (after-all there are several tileable brick/block textures available on Substance Share).
I found the following image which was perfect for my challenge. It was a complex shape and served as good reference for the material’s surface and details:

The most complicated aspect was getting the shape correct. This is one thing you can not easily do in Designer (if at all)…. I therefore started by creating a shape based on my reference image.
I wanted to generate a SVG file so I used a vector drawing application to create the shape. The point of using SVG is that they are resolution independent and tiny in file size. This seemed to be an appropriate approach for working with Designer.
However, I encountered a number of issues which I sort help with from the Allegorithmic support community.
In the end, the best option (for the most accurate results) was to export my shape as a bitmap “mask” to use with Designer’s ‘Tile Generator’ function:

I took what I had learned from my previous experiments to create a Substance that is powered by a single bitmap (which is still very lightweight – 18kb).
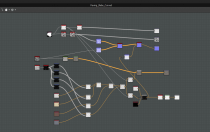
The graph below demonstrates some of the “features” of the Substance such as its tiling attributes, the randomness in the height of each tile, the inclusion of 4 coloured stone chips, each of which also affects the normal and height channels:

My main takeaway from this experience was that unlike modelling and designing (in general), there is no real planning involved other than having very good reference materials.
You build up your Substance one feature or attribute at a time until the surface is ready for use. Then you decide which attributes you should “expose” so that when it comes to using the Substance in a host application (such as Unreal Engine), you provide designers with enough customisation options to create a number of unique instances of your material.
Below the final result of my endeavours:

I am going to establish a library of basic construction materials (such as the ones above) of man-made surfaces. To the above, I will also attempt add a few more interesting tileable shapes (ones that would be difficult to create procedurally).