Today is the last day I have assigned myself to working on this project. To demonstrate the last few stages of production, which is simply painting layers in Substance Painter, I will post images every hour or so (until the football starts this evening). If there is any part of the process that is noteworthy, I will provide the details under the picture.
I decided to document like this after about 2 hours painting so here is the progress from 10.00 – 12.00:
10.00 – 12.00


Added more detail with a second paint layer that sits above the blue. Unlike the white for the decals, the painted white has no height information and is rough (the same roughness as the blue paint). When the light catches the decals they are shiny but I didn’t want that for the paint. I also removed the blue (and white) paint from underside of the nose mesh and turned on shadowing for the screen-grabs.
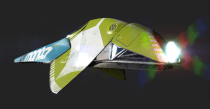
13.00

As much as I liked the all blue livery, I felt it needed an injection of colour. I opted for lime as it seems to contrast against the blue and compliment it at the same time. That’s the great thing about using fill layers and masks. I could quickly change the fill colour and see the updated response with all the layers above it intact and their results visible. I also added white paint (as previous iteration) to the body mesh (the fins) and to demonstrate continuity with my new colour scheme, I revisited the nose mesh and changed the manta ray icon to the top-right of the team name to lime green. Just that little touch makes all the difference. Finally, I added the flag of the driver which is the EU and Union Jack next to each other.
15.00


Not a great deal seems to have happened but that’s because all the work was carried out on the chassis which is exposed in places but mostly sits under the body. If this model were to be used in a game it would allow players to strip it down to the chassis as both front and backs of all components have mesh detail and now paint detail. I also added little touches such as the welding on the “skeleton” components of the chassis. To finish off I added an emissive channel to the chassis mesh and painted the anti-gravity system (bottom of chassis) and booster effect (back of mesh).
I have half an hour more to finish adding tiny details to the rear panel. Then it will be finished.
Final Results


Working on this project has been both a pleasure and a nightmare. The painting aspect went well and I have learned a great deal as well as really enjoying the process of layering up the materials and fully understanding the masking and blending operations. It was the modelling that was the nightmare. As I mentioned in my previous post, I learned so much about hard surface modelling but in the process I made huge mistakes which meant I spent the biggest portion of my time cleaning up my meshes as opposed to painting which is what I had set out to do. It’s all invaluable experience though so it’s good.
This project is now finished and after some administration stuff for work, I will soon start my next project which will bring into play everything I learned over the past 2 weeks.